Kayıtlar

Windows 7 etiketine sahip yayınlar gösteriliyor

Windows 7 ile Server 2008 Kopyalama Sorunu

Resim
Windows 7 işletim sistemine sahip bilgisayarlardan Windows Server 2008 R2 işletim sistemi yüklü olan server’a yapılan kopyalamada kopyalamanın donması, bilgisayarın kilitlemesi ve hatta oturumu veya bilgisayarı yeniden başlattığınızda da kilitlenmesi gibi sorunlar yaşamaya başladıysanız, sizde benim gibi bu durumdan çok sıkılmış olmalısınız. Bu problemden kurtulabilmek için Denetim Masasında (Control Panel) Programlar ve Özellikler’de (Programs and Features) sol menüde bulunan Windows özelliklerini aç veya kapat (Turn Windows features on or off) içerisinden Uzaktan Değişiklikleri Sıkıştırma (Remote Differential Compression) özelliği kaldırılır. Windows 7 Network Problem Yine windows 7 bilgisayarlarda karşılaşılan network yavaşlığı yada outlook’larda maillerin yavaş alınıp gönderilmesi gibi diğer problemlerin çözümü içinde Donatılar (Accessories) altında bulunan Komut İstemi’ne (Command Prompt) sağ tıkla Yönetici olarak çalıştır’la (Run as Administrator) açılır. Sonra “Netsh

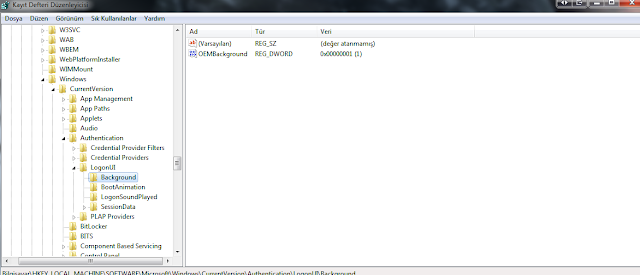
Windows 7 giriş ekranı arka plan resmi değiştirmek

Resim
Başlat -> regedit yazıp çalıştırılır. HKLM\Software\Microsoft\Windows\CurrentVersion\Authentication\LogonUI\Background dizini altında yer alan "OEMBackground" kayıt anahtarının değeri 1 olarak değiştirilir. C:\Windows\System32\oobe\info dizinine gidip "backgrounds" adında yeni bir klasör oluşturulur. Arka plan yapmak istediğimiz resmi "backgroundDefault.jpg" adıyla bu dizine kayıt ediyoruz. Resmin 256 kb'tan küçük olması gerektiğini hatırlatalım. Çözünürlüğe göre farklı resimler yerleştirmek istiyorsak aynı dizin içerisine background768X1280.jpg formatıyla çözünürlükle birlikte resimleri kaydetmemiz yeterli. Bilgisayarımız yeniden başlattığımızda yeni arka planımız ile birlikte giriş ekranımız görüntülenecektir

Install Network Printers Via Batch File or Command Line in Windows 7/8 and Server 2008

Resim
As a desktop administrator, I like to automate as many tasks as possible.  Recently, I needed to automate the installation of network printers in a Windows 7 and Windows Server 2008 environment. After some digging through manuals, I found a solution for installing TCP/IP printers via a batch file. In this tutorial, I will outline the VBS script we will leverage for port creation, and I will also describe the use of rundll32 to install print drivers silently and to create printers. Modern Windows operating systems such as Windows 7, Windows 8, and Windows Server 2008 have great built-in scripting tools and utilities. However, most users are not aware of these abilities.  The guide below includes an example.txt file that will have the generic script included. It also contains an explanation of each step and how to tailor the script to one’s own environment. The following items are used as examples: – A computer on the 192.168.1.x network – An HP Laserjet M603 with static ip

Windows 7: Optional update delivery is not working - “You may be a victim of software counterfeiting.”

Resim
  For several years now Microsoft started to fight non-genuine copies of Windows. Unfortunately still some legal copies are affected by the anti-piracy system. Once you see the message above (Windows Vista or 7) reboot your system as soon as possible and once you login again, Click the Start Menu type “activate windows”. However some users click “Get online and resolve now” link and they get a message Windows Activation: “An unauthorized change was made to Windows. You must reinstall or restore Windows system files to activate.” Proceed with the same procedure, reboot your PC and Activate windows. Microsoft also recommends to uninstall programs that checks your system files such as anti-spyware and third-party firewall. For me, anti-piracy is not needed in all version of Windows because sometimes this a good strategy for both both hardware and software manufacturer to popularize a product. Anyway, All of us have different views but most of the time we share the sam

Display entries in Windows DNS cache

DNS search results are cached on local systems to prevent a lookup every time the search is required. Sometimes during troubleshooting it is helpful to see the contents of the DNS client cache. This recipe describes the process of viewing the Windows DNS cache. To view the DNS cache on the local system, type the following command from a command prompt: ipconfig /displaydns | more The  | more  is optional and will pause the output after each screenful which may be helpful since the DNS cache can get large and the output format uses several lines per record. A sample output from this command is shown below. This is an address lookup for the host microsoft.com. The  Record Name  and  A (Host) Record  lines show the request and answer. The  Time To Live  field shows the number of seconds before this entry expires. microsoft.com —————————————- Record Name . . . . . : microsoft.com Record Type . . . . . : 1 Time To Live  . . . . : 3597 Data Length . . . . . : 4 Section . . . .

Command to Create a Dummy File

Dummy files can be very helpful in a Server environment. For example, having a 5 GB dummy file on the log and database partitions of an Exchange Server will help you resolve a space issue quickly. Simply delete the dummy file, and then you’d have some time to address the issue properly. Use below Windows Commands to create dummy files in a size of your choice. 1 GB dummy file (1024*1024*1024=1073741824): fsutil file createnew dummy.file 1073741824 5 GB dummy file (1024*1024*1024*5=5368709120): fsutil file createnew dummy.file 5368709120

Configuring BDE for Windows 7

Resim
Windows 7 can be very restrictive towards applications written for the previous versions of Windows. This is the case with the  Borland Database Engine (BDE) , which is not capable of running in Windows7 unless two settings have been changed: A permission for the BDE must be given in the windows registry database. A BDE attribute named “Net Dir” must be configured to an arbitrary folder other than the root drive (C:). This configuration is done in the “BDE Administrator” program that’s installed with the BDEInfoSetup utility. 1. First, configure the permission for the BDE in the registry… Make sure you are logged into your Windows7 machine with an administrator account. Then follow these directions: Go to Start | Run… Type regedit… Open the HKEY_LOCAL_MACHINE branch. Open the SOFTWARE branch. Right-Click on the entry labeled “Borland”. In the menu that shows select Permissions. The following dialog will appear: Click “Users”. Under “Permissions for Users “, select

Resetting NTFS Permissions in Windows 7

Here’s the scenario. A friend of mine gave me his old disk drive to have it copied to a new drive. The old drive had permissions set on files and folders. Some of the files were not accessible, I was getting “Access Denied”. I tried to right-click/properties on the folders that were not accessible and changed their owner and changed permissions but some folders were still inaccessible not matter what I did. After some research, it turned out the tool “cacls” that allows one to display or change ACLs (access control lists) can help to reset ACLs. In Windows 7 it is called “icalcs”. To reset files permissions simply do this: Run “cmd” as Administrator Go to the drive or folder in question, for example: cd i: To reset all the files permissions, type: icacls * /T /Q /C /RESET That is it! After that, the files permissions were reset and I could access them just fine. icacls is a handy tool to change permissions of files en masse.