Kayıtlar

2015 tarihine ait yayınlar gösteriliyor

How to create a bootable USB stick on OS X

We would encourage Mac users to download Ubuntu Desktop Edition by burning a CD. But if you prefer to use a USB stick, please follow the instructions below. Note:  this procedure requires that you create an .img file from the .iso file you download. It will also change the filesystem that is on the USB stick to make it bootable, so backup all data before continuing. Tip:  Drag and drop a file from Finder to Terminal to 'paste' the full path without risking typing errors. 1 Download Ubuntu Desktop 2 Open the Terminal (in /Applications/Utilities/ or query Terminal in Spotlight). 3 Convert the .iso file to .img using the convert option of hdiutil e.g., hdiutil convert -format UDRW -o ~/path/to/target.img ~/path/to/ubuntu.iso Note:  OS X tends to put the .dmg ending on the output file automatically. 4 Run diskutil list to get the current list of devices. 5 Insert your flash media. 6 Run diskutil list again and determine the device node
How to Disable the Write Protection on Dell Windows 8 USB Recovery Sticks

Resim
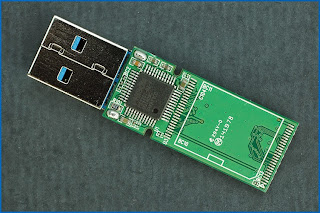
If you've purchased a PC from Dell lately you might have noticed that there is an option to get the recovery media, specifically Windows 8.1, on an 8GB USB flash drive. If you work in an IT department, these flash drives might start piling up and you might want to try and use them, at least some of them, for something else. Here's the rub... the freaking things are read only. I don't know about Dell's consumer level PC's but stuff like the Latitude laptops can be had with an optional 8GB bootable USB 3.0 flash drive with Windows 8.1 on it. Unfortunately, these flash drives are write protected. They can't be written to, formatted, or partitioned, but if you're willing to loose all the data currently on the drive, they can be made to work. Low level formatting the drive will wipe all the data and disable the write protection. A Dell USB flash drive without it's skin A close up of the USB controller chip - Phison PS2251-07 Nope. Cant writ

Migrating DHCP from Windows 2003 to Windows 2008 R2

I guarantee you will love the DHCP from 2008 R2 server. It has new features and plus it works great. But what can you do with the old one that is running on a 2003 server ? You don’t want to lose all the reservations and scope options. The resolution to this problem is to migrate the DHCP database to the new server. The process is straight forward and does not take hours. You will be done in a couple of minutes.  Log on to the 2003 DHCP server, open a terminal and issue this command netsh dhcp server export C:\dhcp.txt all This will create a text file on the root of your C drive called  dhcp.txt , that will contain all the DHCP settings. Now you need to stop the DHCP service on this server. net stop dhcp server   The following assumes that you already installed the DHCP service on the 2008 R2 server; if not  here is an article  on how to do it. Now copy that  .txt  file to the 2008 R2 DHCP server, open a terminal and issue the following command: netsh dhcp server impor

Artefacts and tricks for Mac OS X

Note : if "$ xxx" => command xxx to launch, else => file or directory to dump.  FORENSICS - SYSTEM INFO AND LEAK INFO   PROOF OF CONCEPT Pac4Mac :   https://github.com/sud0man/pac4mac  SYSTEM INFO General information $ System_profiler Owner (name, address, tel, etc.) /Users/ USERNAME /Library/ Preferences / AddressBookMe . plist / Library / Preferences / AddressBookMe . plist / private / var / db /. AppleSetupDone Kernel Version and state /System/ Library / PreferencePanes / Ink . prefPane / Contents / Info . plist $ sysctl - A OS version /System/ Library / PreferencePanes / Ink . prefPane / Contents / Info . plist / System / Library / CoreServices / SystemVersion . plist / System / Library / CoreServices / ServerVersion . plist ( if server ) $ uname - an Timezone /Library/ Preferences /. GlobalPreferences . plist / etc / localtime  AUTHENTICATION DATA Usernames and password hashes /Users/ USERNAME [ 10.6 ]/ var / db / shadow